importgradioas gr
import torch
import requests
from torchvision import transforms
model = torch.hub.load('pytorch/vision:v0.6.0','resnet18', pretrained=True).eval()
response = requests.get("https://git.io/JJkYN")
labels = response.text.split("\n")defpredict(inp):
inp = transforms.ToTensor()(inp).unsqueeze(0)with torch.no_grad():
prediction = torch.nn.functional.softmax(model(inp)[0], dim=0)
confidences ={labels[i]:float(prediction[i])for i inrange(1000)}return confidences
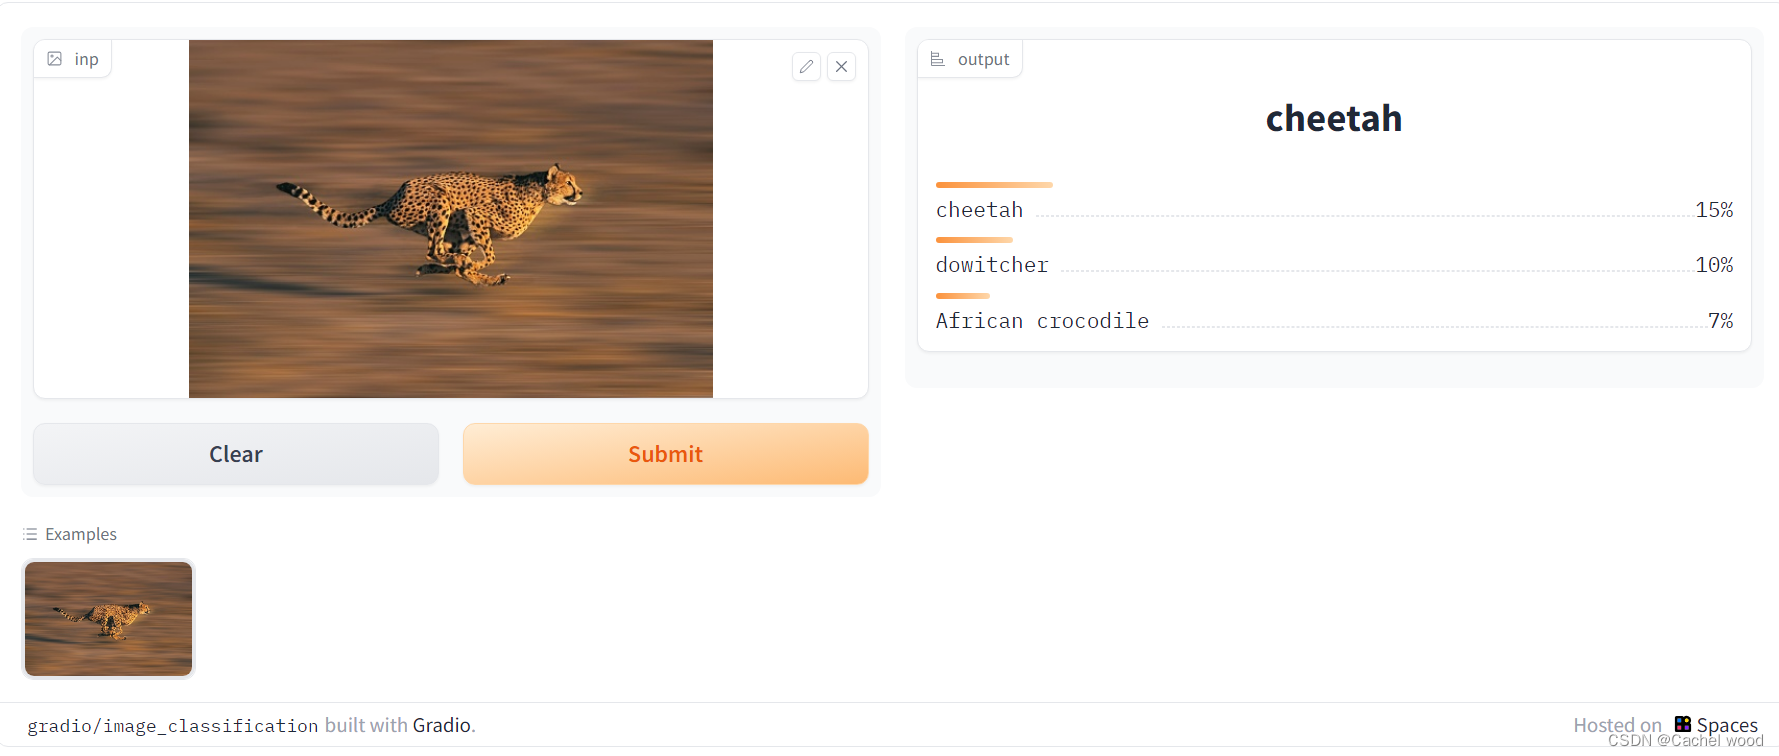
demo = gr.Interface(fn=predict,
inputs=gr.inputs.Image(type="pil"),
outputs=gr.outputs.Label(num_top_classes=3),
examples=[["cheetah.jpg"]],)
demo.launch()
图像分割 Image Segmentation
importgradioas gr
fromtransformers import pipeline
generator = pipeline('text-generation', model='gpt2')defgenerate(text):
result = generator(text, max_length=30, num_return_sequences=1)return result[0]["generated_text"]
examples =[["The Moon's orbit around Earth has"],["The smooth Borealis basin in the Northern Hemisphere covers 40%"],]
demo = gr.Interface(
fn=generate,
inputs=gr.inputs.Textbox(lines=5, label="Input Text"),
outputs=gr.outputs.Textbox(label="Generated Text"),
examples=examples
)
demo.launch()
图像风格变换 Image Transformation with AnimeGAN
importgradioas gr
import torch
model2 = torch.hub.load("AK391/animegan2-pytorch:main","generator",
pretrained=True,
progress=False)
model1 = torch.hub.load("AK391/animegan2-pytorch:main","generator", pretrained="face_paint_512_v1")
face2paint = torch.hub.load('AK391/animegan2-pytorch:main','face2paint',
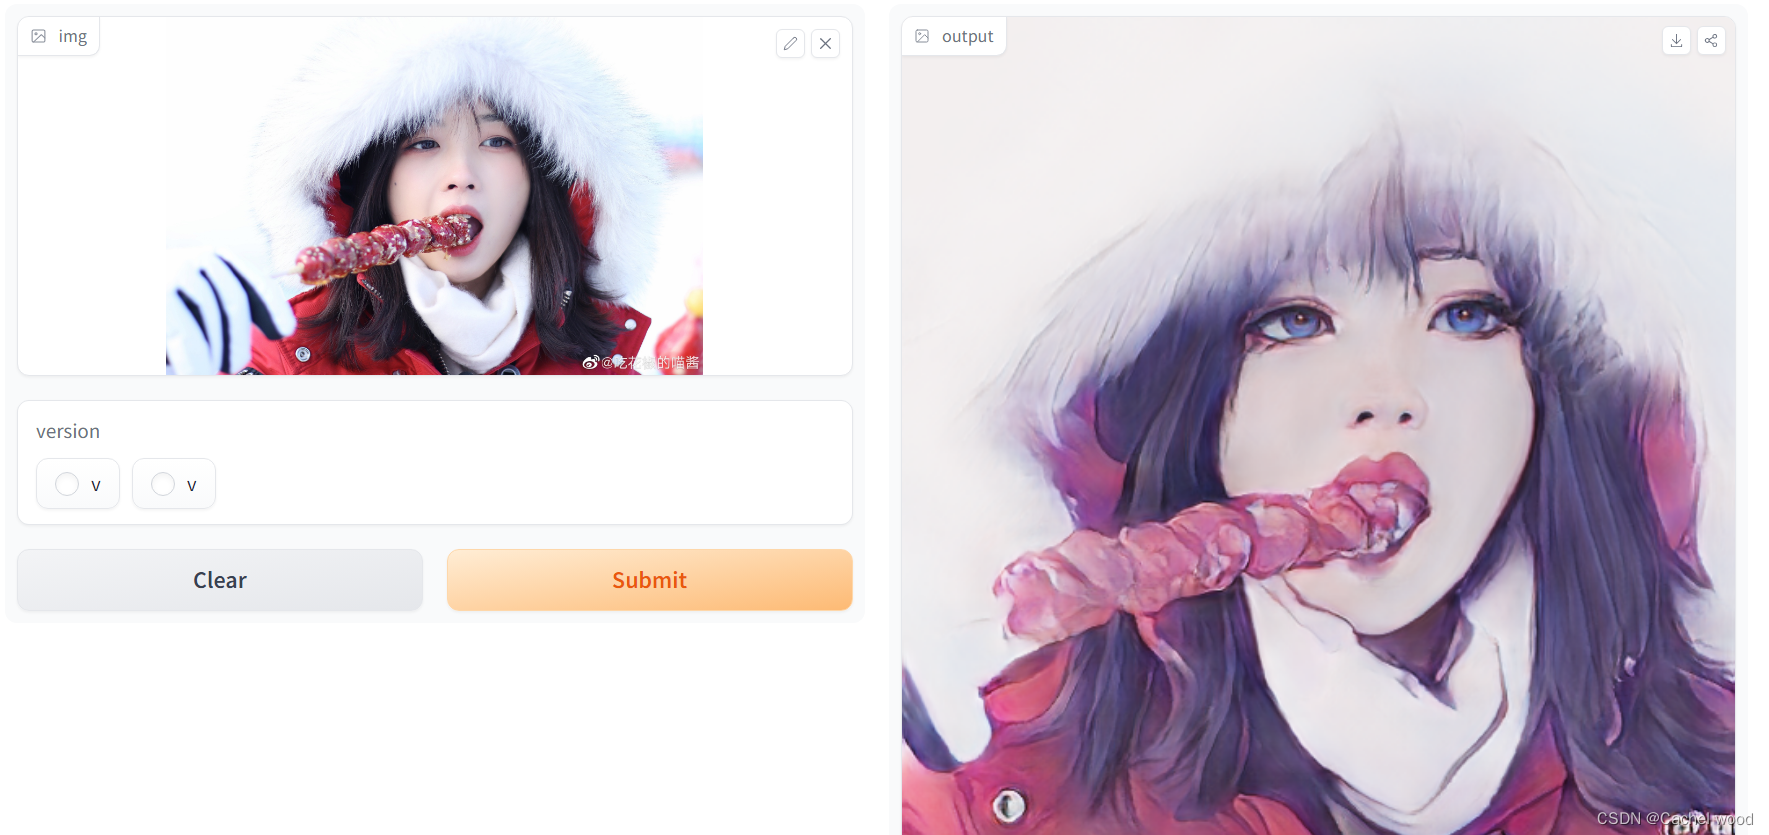
size=512,side_by_side=False)definference(img, ver):if ver =='version 2 (🔺 robustness,🔻 stylization)':
out = face2paint(model2, img)else:
out = face2paint(model1, img)return out
title ="AnimeGANv2"
description ="Gradio Demo for AnimeGanv2 Face Portrait. To use it, simply upload your image, or click one of the examples to load them. Read more at the links below. Please use a cropped portrait picture for best results similar to the examples below."
article ="<p style='text-align: center'><a href='https://github.com/bryandlee/animegan2-pytorch' target='_blank'>Github Repo Pytorch</a></p> <center><img src='https://visitor-badge.glitch.me/badge?page_id=akhaliq_animegan' alt='visitor badge'></center></p>"
examples=[['groot.jpeg','version 2 (🔺 robustness,🔻 stylization)'],['gongyoo.jpeg','version 1 (🔺 stylization, 🔻 robustness)']]
demo = gr.Interface(
fn=inference,
inputs=[gr.inputs.Image(type="pil"),gr.inputs.Radio(['version 1 (🔺 stylization, 🔻 robustness)','version 2 (🔺 robustness,🔻 stylization)'],type="value", default='version 2 (🔺 robustness,🔻 stylization)', label='version')],
outputs=gr.outputs.Image(type="pil"),
title=title,
description=description,
article=article,
examples=examples)
demo.launch()
3D模型 3D models
importgradioas gr
fromtransformers import DPTFeatureExtractor, DPTForDepthEstimation
import torch
import numpy as np
from PIL import Image
import open3d as o3d
from pathlib import Path
feature_extractor = DPTFeatureExtractor.from_pretrained("Intel/dpt-large")
model = DPTForDepthEstimation.from_pretrained("Intel/dpt-large")defprocess_image(image_path):
image_path = Path(image_path)
image_raw = Image.open(image_path)
image = image_raw.resize((800,int(800* image_raw.size[1]/ image_raw.size[0])),
Image.Resampling.LANCZOS)# prepare image for the model
encoding = feature_extractor(image, return_tensors="pt")# forward passwith torch.no_grad():
outputs = model(**encoding)
predicted_depth = outputs.predicted_depth
# interpolate to original size
prediction = torch.nn.functional.interpolate(
predicted_depth.unsqueeze(1),
size=image.size[::-1],
mode="bicubic",
align_corners=False,).squeeze()
output = prediction.cpu().numpy()
depth_image =(output *255/ np.max(output)).astype('uint8')try:
gltf_path = create_3d_obj(np.array(image), depth_image, image_path)
img = Image.fromarray(depth_image)return[img, gltf_path, gltf_path]except Exception:
gltf_path = create_3d_obj(
np.array(image), depth_image, image_path, depth=8)
img = Image.fromarray(depth_image)return[img, gltf_path, gltf_path]except:print("Error reconstructing 3D model")raise Exception("Error reconstructing 3D model")defcreate_3d_obj(rgb_image, depth_image, image_path, depth=10):
depth_o3d = o3d.geometry.Image(depth_image)
image_o3d = o3d.geometry.Image(rgb_image)
rgbd_image = o3d.geometry.RGBDImage.create_from_color_and_depth(
image_o3d, depth_o3d, convert_rgb_to_intensity=False)
w =int(depth_image.shape[1])
h =int(depth_image.shape[0])
camera_intrinsic = o3d.camera.PinholeCameraIntrinsic()
camera_intrinsic.set_intrinsics(w, h,500,500, w/2, h/2)
pcd = o3d.geometry.PointCloud.create_from_rgbd_image(
rgbd_image, camera_intrinsic)print('normals')
pcd.normals = o3d.utility.Vector3dVector(
np.zeros((1,3)))# invalidate existing normals
pcd.estimate_normals(
search_param=o3d.geometry.KDTreeSearchParamHybrid(radius=0.01, max_nn=30))
pcd.orient_normals_towards_camera_location(
camera_location=np.array([0.,0.,1000.]))
pcd.transform([[1,0,0,0],[0,-1,0,0],[0,0,-1,0],[0,0,0,1]])
pcd.transform([[-1,0,0,0],[0,1,0,0],[0,0,1,0],[0,0,0,1]])print('run Poisson surface reconstruction')with o3d.utility.VerbosityContextManager(o3d.utility.VerbosityLevel.Debug):
mesh_raw, densities = o3d.geometry.TriangleMesh.create_from_point_cloud_poisson(
pcd, depth=depth, width=0, scale=1.1, linear_fit=True)
voxel_size =max(mesh_raw.get_max_bound()- mesh_raw.get_min_bound())/256print(f'voxel_size = {voxel_size:e}')
mesh = mesh_raw.simplify_vertex_clustering(
voxel_size=voxel_size,
contraction=o3d.geometry.SimplificationContraction.Average)# vertices_to_remove = densities < np.quantile(densities, 0.001)# mesh.remove_vertices_by_mask(vertices_to_remove)
bbox = pcd.get_axis_aligned_bounding_box()
mesh_crop = mesh.crop(bbox)
gltf_path =f'./{image_path.stem}.gltf'
o3d.io.write_triangle_mesh(
gltf_path, mesh_crop, write_triangle_uvs=True)return gltf_path
title ="Demo: zero-shot depth estimation with DPT + 3D Point Cloud"
description ="This demo is a variation from the original <a href='https://huggingface.co/spaces/nielsr/dpt-depth-estimation' target='_blank'>DPT Demo</a>. It uses the DPT model to predict the depth of an image and then uses 3D Point Cloud to create a 3D object."
examples =[["examples/1-jonathan-borba-CgWTqYxHEkg-unsplash.jpg"]]
iface = gr.Interface(fn=process_image,
inputs=[gr.Image(type="filepath", label="Input Image")],
outputs=[gr.Image(label="predicted depth",type="pil"),
gr.Model3D(label="3d mesh reconstruction", clear_color=[1.0,1.0,1.0,1.0]),
gr.File(label="3d gLTF")],
title=title,
description=description,
examples=examples,
allow_flagging="never",
cache_examples=False)
iface.launch(debug=True, enable_queue=False)
首先,我们需要了解什么是MFC100U.dll文件以及它的作用。MFC100U.dll是一个Microsoft Foundation Class (MFC)库文件,它是Visual C应用程序开发的一部分。MFC库提供了许多通用的功能,如窗口管理、消息处理等,可以帮助开发者更快速地…
Go In OOp 一、 Go是面向对象的吗?二、Structs Instead of Classes 结构体 - OOP in Go三、 Composition Instead of Inheritance 组合嵌套 - OOP in Go1.Composition by embedding structs2. Embedding slice of structs 四、Polymorphism 多态 - OOP in Go1. Polymorphism u…


![SQL 错误 [22007]: ERROR: invalid input syntax for type date: ““](https://img-blog.csdnimg.cn/d13f5e3b10724faf986fa97c8952d583.png#pic_center)