前言:本篇文章主要从代码实现角度研究 Bert Encoder和Transformer Encoder 有什么不同?应该可以帮助你:
- 深入了解Bert Encoder 的结构实现
- 深入了解Transformer Encoder的结构实现
本篇文章不涉及对注意力机制实现的代码研究。
注:本篇文章所得出的结论和其它文章略有不同,有可能是本人代码理解上存在问题,但是又没有找到更多的文章加以验证,并且代码也检查过多遍。
观点不太一致的文章:bert-pytorch版源码详细解读_bert pytorch源码-CSDN博客 这篇文章中,存在 “这个和我之前看的transformers的残差连接层差别还挺大的,所以并不完全和transformers的encoder部分结构一致。” 但是我的分析是:代码实现上不太一样,但是本质上没啥不同,只是Bert Encoder在Attention之后多了一层Linear。具体分析过程和结论可以阅读如下文章。
如有错误或问题,请在评论区回复。
1、研究目标
这里主要的观察对象是BertModel中Bert Encoder是如何构造的?从Bert Tensorflow源码,以及transformers库中源码去看。
然后再看TransformerEncoder是如何构造的?从pytorch内置的transformer模块去看。
最后再对比不同。
2、tensorflow中BertModel主要代码如下
class BertModel(object):
    def __init__(...):
        ...得到了self.embedding_output以及attention_mask

        # transformer_model就代表了Bert Encoder层的所有操作
        self.all_encoder_layers = transformer_model(input_tensor=self.embedding_output, attention_mask=attention_mask,...)

        # 这里all_encoder_layers[-1]是取最后一层encoder的输出
        self.sequence_output = self.all_encoder_layers[-1]

        ...pooler层,对 sequence_output中的first_token_tensor,即CLS对应的表示向量,进行dense+tanh操作
        with tf.variable_scope("pooler"):
          first_token_tensor = tf.squeeze(self.sequence_output[:, 0:1, :], axis=1)
          self.pooled_output = tf.layers.dense(
              first_token_tensor,
              config.hidden_size,
              activation=tf.tanh,
              kernel_initializer=create_initializer(config.initializer_range))

def transformer_model(input_tensor, attention_mask=None,...):
    ...
    for layer_idx in range(num_hidden_layers):
        # 如下(1)(2)(3)就是每一层Bert Encoder包含的结构和操作
        with tf.variable_scope("layer_%d" % layer_idx):
            # (1)attention层:主要包含两个操作,获取attention_output,对attention_output进行dense + dropout + layer_norm
            with tf.variable_scope("attention"):
                # (1.1)通过attention_layer获得 attention_output
                attention_output

                # (1.2)output层:attention_output需要经过dense + dropout + layer_norm操作
                with tf.variable_scope("output"):
                    attention_output = tf.layers.dense(attention_output,hidden_size,...)
                    attention_output = dropout(attention_output, hidden_dropout_prob)
                    # “attention_output + layer_input” 表示 残差连接操作
                    attention_output = layer_norm(attention_output + layer_input)

            # (2)intermediate中间层:对attention_output进行dense+激活(GELU)
            with tf.variable_scope("intermediate"):
              intermediate_output = tf.layers.dense(
                  attention_output,
                  intermediate_size,
                  activation=intermediate_act_fn,)

            # (3)output层:对intermediater_out进行dense + dropout + layer_norm
            with tf.variable_scope("output"):
              layer_output = tf.layers.dense(
                  intermediate_output,
                  hidden_size,
                  kernel_initializer=create_initializer(initializer_range))
              layer_output = dropout(layer_output, hidden_dropout_prob)
              # "layer_output + attention_output"是残差连接操作
              layer_output = layer_norm(layer_output + attention_output)

all_layer_outputs.append(layer_output)3、pytorch的transformers库中的BertModel主要代码;
- 其中BertEncoder对应要研究的目标
class BertModel(BertPreTrainedModel):
    def __init__(self, config, add_pooling_layer=True):
        self.embeddings = BertEmbeddings(config)
        self.encoder = BertEncoder(config)
        self.pooler = BertPooler(config) if add_pooling_layer else None

    def forward(...):
        # 这是嵌入层操作
        embedding_output = self.embeddings(input_ids=input_ids,position_ids=position_ids,token_type_ids=token_type_ids,...)

        # 这是BertEncoder层的操作
        encoder_outputs = self.encoder(embedding_output,attention_mask=extended_attention_mask,...)

        # 这里encoder_outputs是一个对象,encoder_outputs[0]是指最后一层Encoder(BertLayer)输出
        sequence_output = encoder_outputs[0]
        # self.pooler操作是BertPooler层操作,是先取first_token_tensor(即CLS对应的表示向量),然后进行dense+tanh操作
        # 通常pooled_output用于做下游分类任务
        pooled_output = self.pooler(sequence_output) if self.pooler is not None else None

class BertEncoder(nn.Module):
    def __init__(self, config):
        ...
        self.layer = nn.ModuleList([BertLayer(config) for _ in range(config.num_hidden_layers)])
        ...

    def forward(...):
        for i, layer_module in enumerate(self.layer):

            # 元组的append做法,将每一层的hidden_states保存到all_hidden_states;
            # 第一个hidden_states是BertEncoder的输入,后面的都是每一个BertLayer的输出
            if output_hidden_states:
                all_hidden_states = all_hidden_states + (hidden_states,)

            ...
            # 执行BertLayer的forward方法,包含BertAttention层 + BertIntermediate中间层 + BertOutput层
            layer_outputs = layer_module(...)

            # 当前BertLayer的输出
            hidden_states = layer_outputs[0]

            # 添加到all_hidden_states元组中
            if output_hidden_states:
                all_hidden_states = all_hidden_states + (hidden_states,)


class BertLayer(nn.Module):
    def __init__(self, config):
        self.attention = BertAttention(config)
        self.intermediate = BertIntermediate(config)
        self.output = BertOutput(config)

    def forward(...):
        # (1)Attention是指BertAttention
        # BertAttention包含:BertSelfAttention + BertSelfOutput
        # BertSelfAttention包括计算Attention+Dropout
        # BertSelfOutput包含:dense+dropout+LayerNorm,LayerNorm之前会进行残差连接
        self_attention_outputs = self.attention(...)
        # self_attention_outputs是一个元组,取[0]获取当前BertLayer中的Attention层的输出
        attention_output = self_attention_outputs[0]

        # (2)BertIntermediate中间层包含:dense+gelu激活
        # (3)BertOutput层包含:dense+dropout+LayerNorm,LayerNorm之前会进行残差连接
        # feed_forward_chunk的操作是:BertIntermediate(attention_output) + BertOutput(intermediate_output, attention_output)
        # BertIntermediate(attention_output)是:dense+gelu激活
        # BertOutput(intermediate_output, attention_output)是:dense+dropout+LayerNorm;
        # 其中LayerNorm(intermediate_output + attention_output)中的“intermediate_output + attention_output”是残差连接操作
        layer_output = apply_chunking_to_forward(self.feed_forward_chunk, ..., attention_output)
4、pytorch中内置的transformer的TransformerEncoderLayer主要代码
- torch.nn.modules.transformer.TransformerEncoderLayer
class TransformerEncoderLayer(Module):
    '''
    Args:
    d_model: the number of expected features in the input (required).
    nhead: the number of heads in the multiheadattention models (required).
    dim_feedforward: the dimension of the feedforward network model (default=2048).
    dropout: the dropout value (default=0.1).
    activation: the activation function of intermediate layer, relu or gelu (default=relu).

    Examples::
        >>> encoder_layer = nn.TransformerEncoderLayer(d_model=512, nhead=8)
        >>> src = torch.rand(10, 32, 512)
        >>> out = encoder_layer(src)
    '''

    def __init__(self, d_model, nhead, dim_feedforward=2048, dropout=0.1, activation="relu"):
    super(TransformerEncoderLayer, self).__init__()
    self.self_attn = MultiheadAttention(d_model, nhead, dropout=dropout)
    # Implementation of Feedforward model
    self.linear1 = Linear(d_model, dim_feedforward)
    self.dropout = Dropout(dropout)
    self.linear2 = Linear(dim_feedforward, d_model)

    self.norm1 = LayerNorm(d_model)
    self.norm2 = LayerNorm(d_model)
    self.dropout1 = Dropout(dropout)
    self.dropout2 = Dropout(dropout)

    self.activation = _get_activation_fn(activation)

    def forward(...):
        # 过程:
        # (1)MultiheadAttention操作:src2 = self.self_attn
        # (2)Dropout操作:self.dropout1(src2)

        # (3)残差连接:src = src + self.dropout1(src2)
        # (4)LayerNorm操作:src = self.norm1(src)

        # 如下是FeedForword:做两次线性变换,为了更深入的提取特征
        # (5)Linear操作:src = self.linear1(src)
        # (6)RELU激活(默认RELU)操作:self.activation(self.linear1(src))
        # (7)Dropout操作:self.dropout(self.activation(self.linear1(src)))
        # (8)Linear操作:src2 = self.linear2(...)
        # (9)Dropout操作:self.dropout2(src2)

        # (10)残差连接:src = src + self.dropout2(src2)
        # (11)LayerNorm操作:src = self.norm2(src)
        src2 = self.self_attn(src, src, src, attn_mask=src_mask,
                      key_padding_mask=src_key_padding_mask)[0]
        src = src + self.dropout1(src2)
        src = self.norm1(src)
        src2 = self.linear2(self.dropout(self.activation(self.linear1(src))))
        src = src + self.dropout2(src2)
        src = self.norm2(src)
        return src
5、区别总结
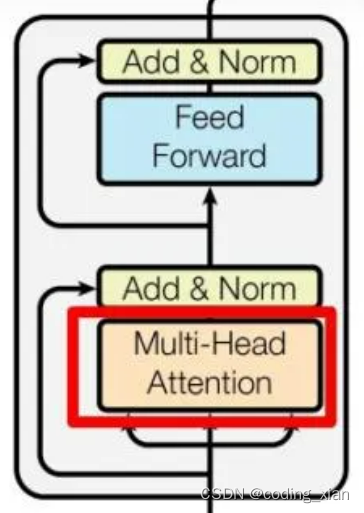
Transformer Encoder的结构如上图所示,代码也基本和上图描述的一致,不过代码中在Multi-Head Attention和Feed Forward之后都存在一个Dropout操作。(可以认为每层网络之后都会接一个Dropout层,是作为网络模块的一部分)
可以将Transformer Encoder过程表述为:
(1)MultiheadAttention + Dropout + 残差连接 + LayerNorm
(2)FeedForword(Linear + RELU + Dropout + Linear + Dropout) + 残差连接 + LayerNorm;Transformer默认的隐含层激活函数是RELU;
可以将 Bert Encoder过程表述为:
(1)BertSelfAttention: MultiheadAttention + Dropout
(2)BertSelfOutput:Linear+ Dropout + 残差连接 + LayerNorm; 注意:这里的残差连接是作用在BertSelfAttention的输入上,不是Linear的输入。
(3)BertIntermediate:Linear + GELU激活
(4)BertOutput:Linear + Dropout + 残差连接 + LayerNorm;注意:这里的残差连接是作用在BertIntermediate的输入上,不是Linear的输入;
进一步,把(1)(2)合并,(3)(4)合并:
(1)MultiheadAttention + Dropout + Linear + Dropout + 残差连接 + LayerNorm
(2)FeedForword(Linear + GELU激活 + Linear + Dropout) + 残差连接 + LayerNorm;Bert默认的隐含层激活函数是GELU;
所以,Bert Encoder和Transformer Encoder最大的区别是,Bert Encoder在做完Attention计算后,还会用一个线性层去提取特征,然后才进行残差连接。其次,是FeedForword中的默认激活函数不同。Bert Encoder图结构如下:

Bert 为什么要这么做?或许是多一个线性层,特征提取能力更强,模型表征能力更好。
GELU和RELU:GELU是RELU的改进版,效果更好。
Reference
- GeLU、ReLU函数学习_gelu和relu-CSDN博客